Where Are Library Files On Mac User
What does mac os /Library folder store? Ask Question Asked 7 years, 1 month ago. And support files. There are 4 (well, normally just 3) of them: The user library, /Library, stores per-user settings etc. The local library, /Library, stores computer-wide settings etc. BTW, I call this the 'local' library, because in NextStep it was /Local. Jul 05, 2017 For example, the location of my “Work” profile in Windows 10 is actually C:UsersLoriAppDataLocalGoogleChromeUser DataProfile 3. You can select the path and copy it and paste it into File Explorer in Windows, the Finder on OS X, or into a file manager like Nautilus in Linux to access that folder. With the release of Mac OS X Lion way back in 2011, Apple removed easy access to the user’s Library folder. Although arguably well-intentioned, this change was frustrating for longtime Mac power. By default, the User Library folder is hidden in Mac OS 10.7 and above. We'll cover a few different methods to easily access this hidden folder. The User Library is home to many 'under the hood' files and folders that correspond to the various Apps and system processes in your computer. Problem to be Solved You’ve got a great backup of your OSX computer, and you need to get something back from the Library folder, say something in the Application Support subfolder. These instructions will show you how to do unhide the User Library folder on the external drive or even on a second Mac.
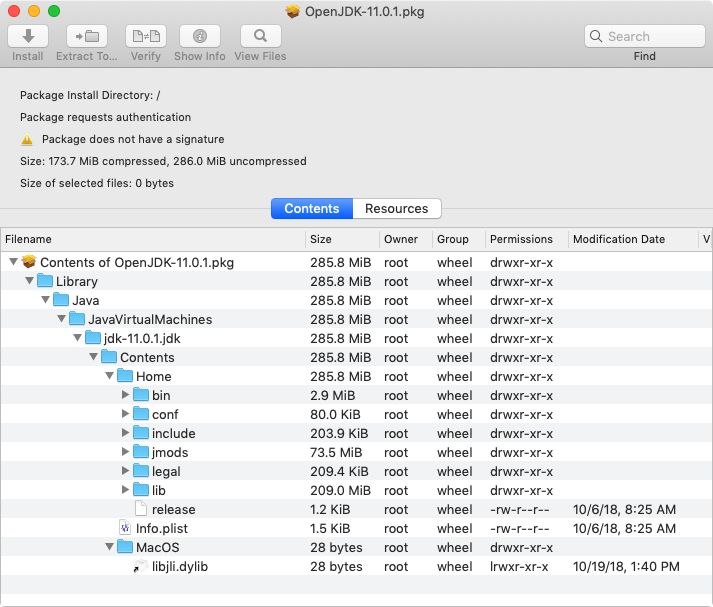 Im using Mac only at work and I need to set JAVAHOME to proper path of JDK. I downloaded JDK, installed it and now I can't find it anywhere. I was looking at the internet for the solution, but there is no folder Libraries/Java.
- Move Files On Mac
- Where Are Library Files On Mac User Search
- Where Are Library Files On Mac User Free
- Where Are Library Files On Mac User Windows 7
Apr 19, 2012 How to browse another account's files in OS X. While you can use the Terminal to manage files in another user's account, you can also use the Finder to. Jan 12, 2020 The Library folder contains many of the resources that installed applications need to use, including application preferences, application support documents, plug-in folders, and ever since OS X Lion, the files that describe the saved state of applications.
Summary: This blog shares reliable methods for recovering permanently deleted log files, caches, and library files from Mac start-up disk. It outlines two approaches for recovering deleted library and logs as follows:
|
Most websites use cookies and create temporary caches on your Mac when you browse the Internet. While this helps improve your online experience by quickly loading images and data every time you visit the site again, it creates files on your hard drive that can eat up space unnecessarily. Over time, not only does it slow down the performance of your web browser but also of your whole Mac. Thus, experts suggest that clearing system caches and browser cookies can help improve browser and Mac performance significantly.
All of this sounds quite straightforward, but in reality, it requires caution. When trying to manually delete cache and other log files that aren’t required by the Mac, many users inadvertently delete system files that are needed by other applications. As a result, some system apps can start behaving unexpectedly. In such a scenario you either need to uninstall and reinstall those apps or reformat your Mac. Alternatively, if you can recover deleted log files and caches, the problem can be solved.
Let us have a look at some of the simplest ways to recover deleted macOS caches, log files, and Library folders.
Recover deleted system files manually
From the Trash folder
Om macOS, when you select files and press the ‘Delete’ button, they’re moved to the Trash folder. If that’s how you’ve deleted caches and log files, recovering them through the below steps—
- Open the ‘Trash’ folder by double-clicking on the trash can icon on the desktop
- Locate the files you wish to recover
- Right-click on the files
- Select ‘Put Back’
- If the original location of the files no longer exists, drag the files to the desktop and then move them to any other desired folder
From Time Machine Backup
Most macOS users rely on Time Machine to take regular backups of all data on their hard drives. If you’ve permanently deleted cache files through ‘Command + Shift + Option + Delete’ operation, your latest Time Machine backup is where you can get them back from. Follow the below steps—
- Connect your Time Machine backup drive to your Mac
- Select the backup that you wish to restore
- Click on ‘Restore’
Recover macOS caches folder, log files, Library folders automatically
If your data has been permanently deleted and you don’t have a backup from which you can recover it, the most reliable option to restore them is to opt for the secure and reliableMac Data Recovery software. Backed by powerful scanning algorithms, this competent software scans your entire Mac hard drive to search for recoverable data and performs safe and accurate recovery. With it, you can easily recover deleted Library folders, macOS cache folders, log files, and other documents, photos, music files, or videos that have been deleted from APFS, HFS, HFS+, FAT, ex-FAT and NTFS format based file systems.
When the recovery process completes, you should be able to view all deleted caches, log and library files accurately recovered on your macOS.
Conclusion
Almost all deleted data can be recovered safely if you exercise caution and act quickly. Keep the above methods in mind as they will aid you considerably; and if all else fails, then leverage the secure and reliable Stellar Data Recovery for Mac software.
If you want to find out where iTunes stores your library files, the following guide should help you find the iTunes library location on both your Windows and Mac machines. Read on to even learn how to change the locations on your computer.
iTunes Tips & Issues
iTunes Basic Learning
iTunes Converting Tips
iTunes Music Tips
iTunes Libary Tips
iTunes Connection Issues
iTunes Data Loss
Other iTunes Issues
iTunes provides you an easy way to add new files and organize existing files on its interface on your computer. The interface lets you view your files, their dates, and other information about your files. However, what you do not see in the list is where exactly your files are stored. iTunes has been quite confidential about it and it does not directly let users view the location of the stored files.
If you are curious and you would like to find out the iTunes library location on Windows or Mac, we have you covered. The following guide shows you the locations of the folders where iTunes stores your music and other media files on your computer’s storage. Once you have found where your files are actually located, you can play around with them just like any other files on your computer.
How to Find iTunes Library Locations on Computer
Finding the iTunes files location on a computer is extremely easy. This section should teach you how you find the folder on your PC or Mac computer.
Find iTunes Library Locations on Mac:
- Get to the desktop of your Mac so you are inside a Finder window.
- Click on the “Go” button at the top in your menu bar.
- Select the option that says “Home”. It will take you to your home directory.
- When the Home directory launches in Finder, open the folder named “Music” followed by iTunes.
- What you now see on your screen is the folder where the iTunes app stores your media files.
Find iTunes Library Locations on PC:
- All you need to do is open the File Explorer utility.
- Head to the C:Users[username]My MusiciTunes path.
- Once you are there, you should be able to see all of your iTunes media content.
How to Change iTunes Library Location
While the default iTunes storage folders are not that bad, you can change the locations on your computer if you would like. Once you change the location, iTunes will begin to store your newly imported files into your new location on your computer.
1. How to Change iTunes Library Location on Mac
Changing the iTunes files location on a Mac is pretty easy as you can do the task from within the iTunes app on your machine. You just need to modify an option in the settings and your task will be done. Here’s how you do it:
Step 1. Launch the iTunes app from Launchpad on your Mac.
How to Change iTunes Library Location on Mac – Step 1
Step 2. When the iTunes app launches, click on the iTunes menu at the top and select the option that says Preferences. It will open the iTunes settings screen on your Mac.
Move Files On Mac
How to Change iTunes Library Location on Mac – Step 2

Step 3. When the settings menu opens, click on the last tab that says Advanced. Once you are there, click on the Change button given next to the iTunes Media folder location. You should be able to specify a new location for iTunes media files on your Mac.
How to Change iTunes Library Location on Mac – Step 3
2. How to Change iTunes Library Location on PC
Windows users can also easily change the iTunes storage location and that too from within the iTunes app. The following is how you do it.
Step 1. Launch the iTunes app and click on Edit followed by Preferences.
Where do i find library preferences on my mac. And your favorite System Preferences trick?How often do you play with System Preferences on your Mac and what do you use it most for? To bring up System Preferences resources in Apple Help, select Finder → Help and type “Customize your Mac in System Preferences” into the search field. Help is but a click awayIf you get stuck or want to learn about all the ways System Preferences can help you customize your Mac to your liking, browse Apple’s built-in help.
Where Are Library Files On Mac User Search
Step 2. Head to the Advanced tab and click on the Change button to change your iTunes media folder.
That’s how you change the iTunes media folder location on your Windows PC.
The Bottom Line
If you have not been able to find the iTunes media folder on your Windows PC or Mac, the above guide should help you find the folder very easily on your computer. It also teaches how you can change the default iTunes folder if you would like to do it.
More Related Articles
Where Are Library Files On Mac User Free
Popular Articles & Tips You May Like
Where Are Library Files On Mac User Windows 7
Product-related questions? Contact Our Support Team to Get Quick Solution >